Friday, December 30, 2011

Outfit Post // New Years Eve Glitters


Hello friends!! Here is a sneak preview of what I intend to wear on New Years Eve. This is another dress made from my current favourite pattern. This time I made the top part out of black lace with a silver thread running through it and black cotton on the bottom half. I love how it came out!!

Left: Day Outfit - Black & Silver Lace Dress -  Made by me, Shoes - No 1 Shoe Warehouse,  
Jacket - Recycle Boutique
Right: Night Outfit - Black & Silver Lace Dress - Made by me, Sequin Clutch - Kmart,  
Silver glitter heels - No 1 Shoe Warehouse

I’m matching my dress with my favourite sequin clutch bag and some glittery silver heels. I’m looking forward to a night of girly talk, drinks, good food and dancing at my friends hens party. Bring it on!

I hope you all have a wonderful New Years Eve and we’ll catch up in the New Year!


Saturday, December 24, 2011

Life Lately // Merry Christmas!!


Merry Christmas friends!! I hope you all have a great day filled with family and friends, good food and some great presents!

 Red Dress - Made by me, Shoes - No 1 Shoe Warehouse, Leopard Print Bag - Strandbags

I’ll be up in Dunedin spending the day with my family. I can’t wait to hang with my little nephew on his first Christmas! Catch you all in the New Year dudes – 2011 has whizzed by!


Tuesday, December 13, 2011

Outfit Post // Pink at the Races


Yes, I still do outfit posts on my blog! It has been a while though. It’s been a busy few months settling in to my new house, getting used to working by myself from home and planning, photographing and writing my ’12 Days of Christmas’  posts. Phew!


Anyway, this is the outfit I wore to The Invercargill races in the weekend for Andrews work do. It was sooo hot!! It was such a fun day, we were divided up into groups of 5, we put in $20 each and we all picked 1 horse each per race and then put down our 5 horses as a $10 trifecta bet. The group I was in had 3 wins in the first 3 races! By the end of the day we were up $60 on our original group total, so put down $30 on each of the last 2 races. Unfortunately our winning streak was over! But we left with the $20 we started with so it’s all good.

 Dress - Made by me, Pink Fascinator - Spotlight, White Clutch - Diva,  
 White Heels - No. 1 Shoe Warehouse

I whipped up this dress on my sewing machine last Thursday and Friday night. It’s the same pattern as the dress I made for my sewing class, but I free-handed the heart cut out for the back and closed the top piece with 3 little metal closures. I read an article a while ago about a woman who was making costumes for a local event. She said that when she was young in the 1960’s, she would sew a dress on the Saturday to wear to a dance being held that night. I love that idea! Making a new dress for a special occasion. So now I have great plans for dresses for future events...


I hope you all had a great weekend! The weather here has been amazing lately. Invercargill is surprising me! Thank you for all your nice comments on my ’12 Days of Christmas’ posts! I’ve loved reading all your comments, and I hope some of the 50 or so viewers that have visited each day lately have got some new, cheap DIY ideas for their Christmas this year.

Tomorrow night I’m off to Dunedin to watch the Phoenix play soccer and go to a wedding on the weekend. I’m looking forward to it! 1 1/2 weeks until Christmas – woohoo!! 


Monday, December 12, 2011

12th day of Christmas // After Dinner Mints


Grandparents are always a hard one to buy for I find. I usually buy my Granddad some after dinner mints as that’s his favourite treat, so this year I thought I’d make some instead!

I did a bit of research around the internet and adapted a recipe I found. It’s so easy and simple to make these! Mine are a bit bigger than the ones you can buy but that’s not necessarily a bad thing aye?


You will need;

Ingredients as per below
Two bowls (one for chocolate, one for the peppermint mixture)
Rubber gloves
A spatula
A fork
A microwave

1/2 Can Condensed Milk
3 C Icing Sugar
1 t Peppermint Essence
1 t Kremelta
300g Chocolate (I used 1 1/2 blocks of Cadbury Old Gold chocolate)


1. Add the condensed milk, essence and icing sugar to a bowl.  
2. Mix together wearing gloves to form a stiff dough.  
3. Roll teaspoons of the mixture into balls and place on a baking paper covered tray.
4. Flatten slightly with a spoon dipped in icing sugar to prevent sticking. Leave to dry for 1/2 an hour. 


5. Add the chocolate and kremelta to a bowl and microwave 30 secs at a time until melted.  
6. Use a fork to dip the peppermints into the chocolate and quickly flip them over to cover.
7. Take out the peppermint, wipe the base of the fork on the edge of the bowl and gently jiggle the after dinner mint onto a clean baking paper covered tray.  
8. Gently touch the fork to the top of the mint and pull it away to the front to make the little ridges after dinner mints usually have.


Leave them to set on the tray. They will take a little bit longer because of the added kremelta but they will have a nice finish to them! I managed to make about 28 from one batch.


Once they are all set, just package them up however you like. I think mine will go into cellophane bags, tied with some string and a gift tag!

Like all of my '12 Days of Christmas' DIY tutorials, there is a PDF version of this blog post here. Simpy click on the link, print out the tutorial and get to work. Easy as that. Feedback appreciated!

Make sure to check out the rest of my 12 Days of Christmas posts for more awesome decorating ideas, recipes, and gift ideas!

Sunday, December 11, 2011

11th Day of Christmas // Gift Wrapping


I always end up spending so much money on wrapping paper. It certainly adds up pretty quick! I hate buying the really cheap stuff as it never stays together when you tape it and it always rips when you try and move your presents (mine always end up going on a car ride somewhere!)

This year I’m going heavy duty – I’m using brown paper! It’s nice and strong and is made of recycled material so that makes me feel a bit better. I’m jazzing it up with paper doilies and string with white and gold gift tags.

Follow the tutorial below to see how I wrapped my presents. It’s super easy and pretty!

You will need;

Brown paper (mine is from The warehouse or try a postage shop or stationary shop)
White Paper Doilies, various sizes
Gold Paper Doilies
White Card
Gift Card Pattern – available in a PDF here
PVA Glue or similar
String
Hole Punch


1. Wrap your chosen present in brown paper.  
2. Place a bit of glue on the back of a doily and stick to the top side of the present.   
3. Cut enough string to wrap around the present a couple of times.
4.  Wrap string around and tie in a knot.


1. Trace around the size of gift tag you want for your present and cut it out.  
2. Position the cut out tag under a gold doily and trim around the tag. Glue the doily to the tag.
3. Hole punch the pointed end of the tag, then write the name of the gifts recipient on the tag
4. Thread the tag onto the string on your present and tie the string in a bow.


You could use coloured doilies if you can find them, or use white doilies and coloured card for your tags.

You could also tie on some mini candy canes or chocolates to add an extra little treat to your presents! 

Like all of my '12 Days of Christmas' DIY tutorials, there is a PDF version of this blog post here. Simpy click on the link, print out the tutorial and get to work. Easy as that. Feedback appreciated!

Make sure to check out the rest of my “12 Days of Christmas” posts for more awesome decorating ideas, recipes, and gift ideas!


10th Day of Christmas // Chocolate Sleigh


At the last Dunedin Sugarcraft Club meeting I went to in Dunedin we were shown some different Christmas-themed demonstrations. My favourite was this awesome chocolate sleigh!

It would look great as a centrepiece on your table, filled up with yummy chocolates. When you’ve finished all those you can start nibbling the sleigh too! It would also make a cool present filled with chocolates or truffles and wrapped up in cellophane with a ribbon. 


You will need;

1 Bag Chocolate Buttons (I used Nestle)
Baking Paper
Sleigh Pattern – you can find that here
Piping bag
Round-tip Nozzle


1. Melt 1/2 the chocolate in microwave – 30 secs at a time until melted. Don’t burn it!
2. Add 1/4 more buttons to the chocolate but don’t microwave – just stir until they have melted.
3. Lay pattern on a table or board and cover with a piece of baking paper.
4. Fill piping bag fitted with a small round nozzle with chocolate and pipe around edge of sleigh pattern (5mm thick)


5. Spoon chocolate into the centre of the sleigh pieces, spread to the edges and then leave to dry.
6. Once the pieces are dry, set up the base, one side and the back piece leaning against glasses and pipe chocolate in the inside corners to stick them together.
7. Add the front end piece and stick with more chocolate, then the other side.
8. Leave the sleigh to dry until all the chocolate is set.

Once the pieces are dry, set up your sleigh on a presentation plate and fill up with your favourite chocolates – I’m using peppermint and strawberry Roses chocolates!


Yum yum!! You can make your sleigh out of dark, milk or white chocolate – it’s up to you. Just remember white chocolate is a little harder to work with than the other 2 – be very careful when you are melting it! 

PS: Sorry todays post is a day late! I was busy all day yesterday at Andrews work do at the races. I'll have an outfit post up next week with what I wore!

Like all of my '12 Days of Christmas' DIY tutorials, there is a PDF version of this blog post here. Simpy click on the link, print out the tutorial and get to work. Easy as that. Feedback appreciated!

Make sure to check out the rest of my “12 Days of Christmas” posts for more awesome decorating ideas, recipes, and gift ideas!

Friday, December 9, 2011

9th Day of Christmas // Mini Pavlovas


While I’ve featured a few cold weather themed goodies on here, I thought it was time I threw in a kiwi favourite – the pavlova!

We always have pavlova at our family Christmas get-togethers. They’re usually made by my Grandma, Mum and Andrew’s Mum, so it’s not unusual to have 3 pavlovas in a couple of days! (we usually have the 24th December with one side of the family, then the 25th with the other side)

Here’s what Wikipedia has to say on Pavlova. Basically it’s a big meringue with a marshmellowy centre, topped with cream and usually sliced kiwifruit and strawberries. Yum yum!!

This recipe is my Mums. I’m not sure where she got it from but I think it’s out of a magazine. It’s so easy! And pretty much a no-fail recipe too.

Mini Pavlovas
You will need;

Ingredients as listed below
An electric beater or cake mixer
A spatula
Baking tray

Just follow the picture tutorial below. There is a PDF version of this post available here!


3 Egg Whites
1 C Castor Sugar
1/2 t Malt Vinegar
2 t Cornflour
1/2 t Vanilla Essence

Heat oven to 120°C. 


1. Separate egg whites into a glass bowl.
2. Beat until egg whites are stiff. They should stand up in a point when you lift the beater.
3. Slowly add the sugar 1/2 teaspoon at a time and beat through.
4. The mixture should look like this when it’s done. 


1. Add the cornflour, vanilla and malt vinegar and beat through.
2. Draw pencil circles on some baking paper; turn over so the pencil side is against the tray.
3. Spoon the pavlova mixture onto the circles and spread out, with a small dent in the centre.
4. Bake for 1 hour. The pavlovas should still be fairly white and crispy on the outside. 

Once your pavlovas are cool, whip up some cream and spread over the top. Add some chopped strawberries and kiwifruit and you’re done!


You could also top your pavlovas with passionfruit syrup, raspberries, grated chocolate....the options are endless!! Enjoy!

Like all of my '12 Days of Christmas' DIY tutorials, there is a PDF version of this blog post here. Simpy click on the link, print out the tutorial and get to work. Easy as that. Feedback appreciated!

Make sure to check out the rest of my 12 Days of Christmas posts for more awesome decorating ideas, recipes, and gift ideas!


Thursday, December 8, 2011

8th Day of Christmas // DIY Body Scrubs


While thinking of Christmas present ideas for my Mum and Sister I remembered something I had been researching a while ago – homemade body scrubs!! Perfect! ( I had a look at this website)

I love body scrubs!! I love how your skin feels so nice and smooth afterwards. I 
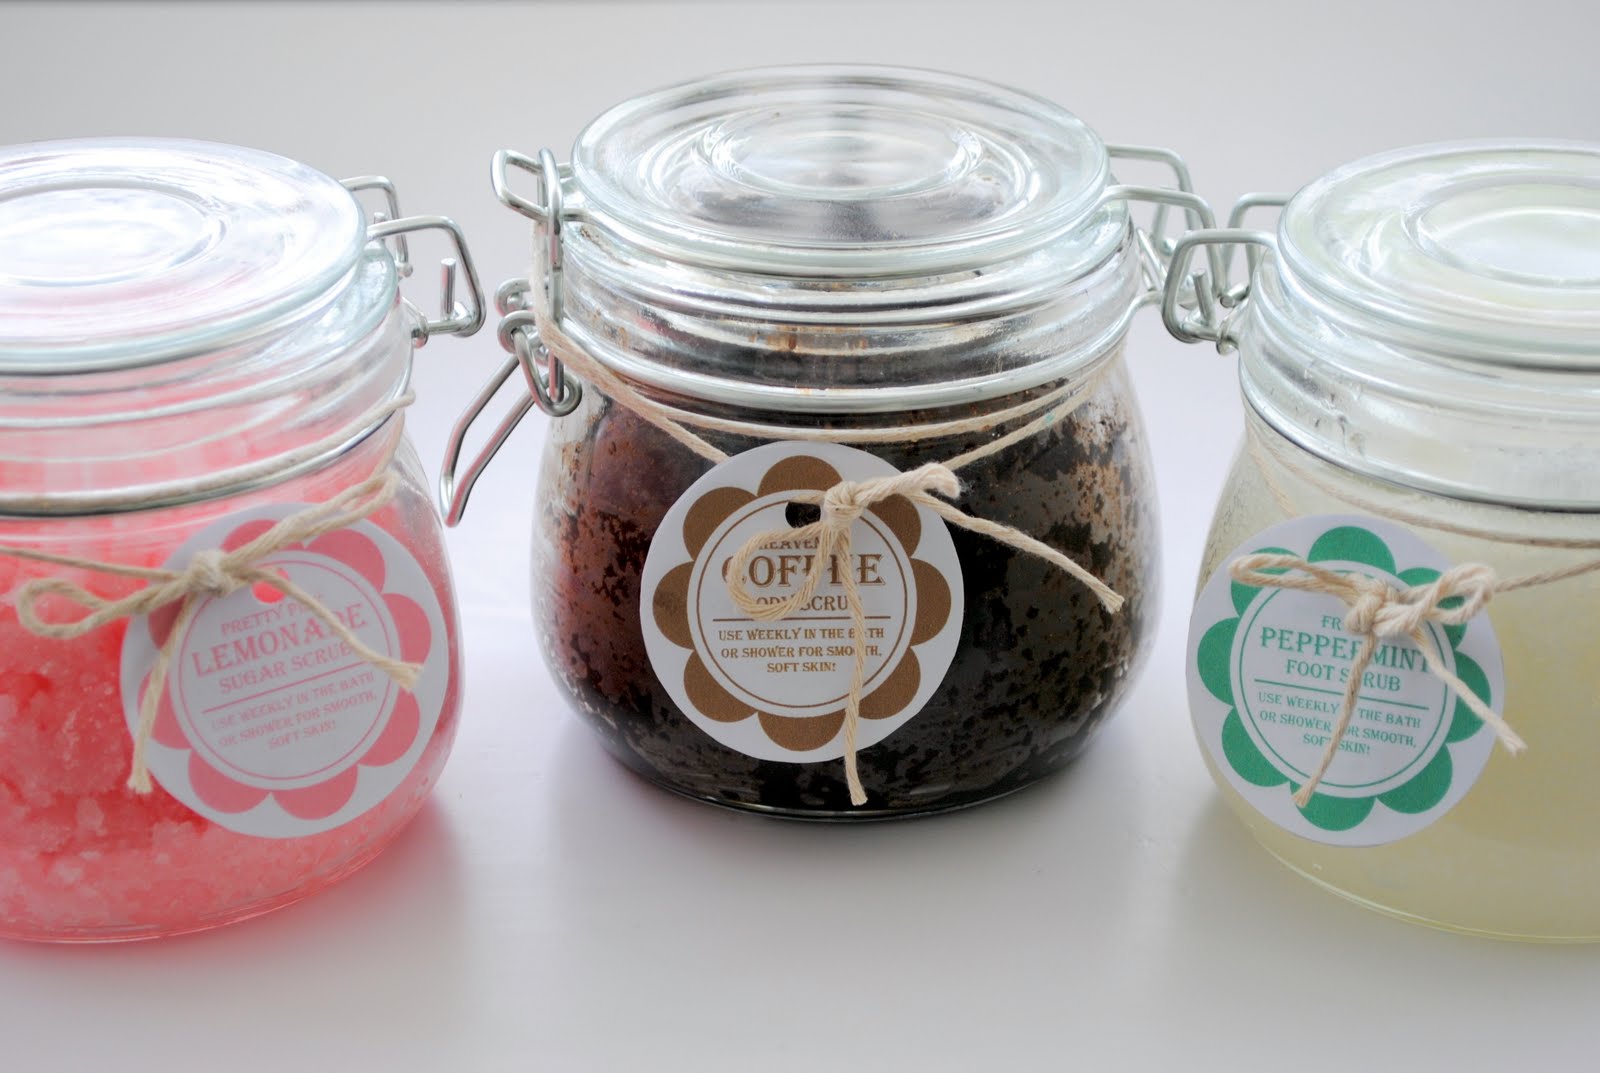
think I’ll make a pink lemonade body scrub for my Sister and a peppermint foot scrub for my Mum, she loves pampering her feet!

I’ve been using the peppermint one as a face scrub in the mornings to wake me up and I can’t wait to use the coffee one in the shower.

Homemade Body Scrubs

You will need;

Sugar (See recipes for what sort)
Preserving jars
A bowl and spoon for mixing them
A variety of essences or essential oils
Sunflower Oil
Gift tags or labels (which are available in a printable PDF here!)

I’ve included a picture tutorial for the Pink Lemonade scrub, all the others are very similar so just follow the recipes!

Pink Lemonade Sugar Scrub

2 C White Castor Sugar
2/3 C Sunflower Oil
2 t Lemon Essence
Drop of red or pink food colouring


1. Measure the sugar into a bowl and mash through the colouring and essence.
2. Add the lemon essence and colouring.
3. Begin adding the oil slowly; stir to combine until mixture looks like wet sand.
4. Fill up your chosen container and attach the label. Find it here.

Coffee Body Scrub

2 C Ground Coffee
2 T Castor Sugar
2/3 C Sunflower Oil
2 t Ground Cinnamon

1. Measure coffee into a bowl.
2. Add the cinnamon and the sugar. 
3. Begin adding the oil slowly; stir to combine until mixture looks like wet sand.
4. Fill up your chosen container and attach the label. Find it here.

Brown Sugar Scrub

2 C Brown Sugar
2/3 C Sunflower Oil
2 t Vanilla Essence

1. Measure the sugar into a bowl.
2. Add the vanilla essence.
3. Begin adding the oil slowly; stir to combine until mixture looks like wet sand.
4. Fill up your chosen container and attach the label. Find it here.

Peppermint Foot Scrub

2 C White Castor Sugar
2/3 C Sunflower Oil
1 1/2 t Peppermint Essence

1. Measure the sugar into a bowl and mash through the essence.
2. Add the peppermint essence.
3. Begin adding the oil slowly; stir to combine until mixture looks like wet sand.
4. Fill up your chosen container and attach the label. Find it here.


Make sure to take note of the warning on the labels – the oil residue can build up on the base of your shower and make it slippery, so make sure the recipient knows about this to avoid any accidents! I just keep a shower cleaner in my bathroom cupboard and give the shower a quick spray and scrub it clean with a brush after my morning shower. It takes 2 minutes! 


Like all of my '12 Days of Christmas' DIY tutorials, there is a PDF version of this blog post here. Simpy click on the link, print out the tutorial and get to work. Easy as that. Feedback appreciated!
                                                             
Make sure to check out the rest of my 12Days of Christmas posts for more awesome decorating ideas, recipes, and gift ideas!


Wednesday, December 7, 2011

7th day of Christmas // Berry Fruit Mince Tarts


While working in a Cafe close to Christmas one year I was asked to make some mini fruit mince tarts for out the front. They were so fun to make and were popular with the customers too!

Personally I’ve never really been a fan of the traditional fruit mince filling. Occasionally I will nibble at one on Christmas day but my heart is never quite in it!

I decided this year I would make some that I liked. I’m making my berry fruit mince from scratch, but if you are in New Zealand and are short on time, Barkers make a very nice berry filling you can buy in your supermarket now! (it comes in a jar like jam, it will either be in the baking section or by the jams)

I modified this recipe from a couple I found on the internet. You end up with a sticky, tart fruit mince which I could quite happily eat by itself in spoonfuls!

**Make your fruit mince a couple of days in advance of making your tarts. If you want to make it even earlier, just store it in a container in the freezer until you’re ready to use it. 

Berry Fruit Mince


Rind of 1 Lemon
Rind of 1 Orange
1/4 C Sugar
1/4 C Brown Sugar
1 Granny Smith Apple, chopped into small cubes
Juice of 1 Lemon
1 C Sultanas
1 C Mixed Dried Berries (Mine had blueberries, raspberries, cranberries and cherries)
1/2 t Cinnamon
1/2 t Mixed Spice
1/2 t Nutmeg
Pinch of Salt
1/4 t Ground Cloves
30ml Brandy, Whiskey, Rum, Sherry or Port (or brandy essence and water)

1. Pile half of the berries and half the sultanas on a board and chop finely. (You could do this in a food processor if you have one – I don’t)
2. Add all the ingredients to a saucepan and stir over medium heat until the sugar has melted, the mix begins to go syrupy and most of the liquid has evaporated.
3. Remove from the heat and leave to cool.
4. Place into a container and keep in the fridge for a couple of days before using.

Sweet Shortcrust Pastry

1 C Plain Flour
75g Butter
¼ C Sugar
1 Egg Yolk
1 T Water


1. Sift flour into a bowl.
2. Rub in butter until it resembles bread crumbs.
3. Add egg yolk and water.
4. Mix to form a stiff dough then chill for 30 minutes before using.

Putting it All Together

You will need;

Sweet Shortcrust pastry (you could use store bought stuff if you want!)
Berry Fruit mince
Small star cutter
Mini muffin trays
Circle cutter for tart base
Flour for dusting bench
Rolling pin
Oil spray to grease tins

Heat oven to 200°C.


1. Roll out pastry to about 3mm thick and cut out your tart bases with a circle cutter.
2. Press bases into mini muffin tins.
3. Add a 3/4 teaspoon full of fruit mince to each tart
4. Top with a cut out star and bake until pastry is cooked and just starting to brown, about 10 to 15 minutes. Keep an eye on them though!


Once your tarts are out of the oven, leave them to cool for a bit in their trays and then place them on a cake rack to cool completely.


All done!! These are such a nice refreshing change to the traditional fruit mince tarts. I’m going to take mine along to my Cake Decorating club’s Christmas function where I plan to have a little toothpick sign stuck in them so people know they are berry ones!

I tried some of the extra ones out on my family, they all got gave them the thumbs up and none of them like the traditional fruit tarts. I reckon it’s a winner!

Like all of my '12 Days of Christmas' DIY tutorials, there is a PDF version of this blog post here. Simpy click on the link, print out the tutorial and get to work. Easy as that. Feedback appreciated!

Make sure to check out the rest of my 12 Days of Christmas posts for more awesome decorating ideas, recipes, and gift ideas!